A standard residential concrete patio — 12 ft × 16 ft (3.6 × 4.9 m) at 4 inches (100 mm) thick — requires 2.9 cubic yards (2.2 m³) of concrete and costs $1,400–$2,800 installed, depending on location, finishes, and reinforcement. That range is wide because finishing choices (broom, exposed aggregate, stamped) vary in both material and labour cost more than the concrete itself. Understanding which variables drive cost gives you actual control over your budget.
Calculating concrete volume for a patio
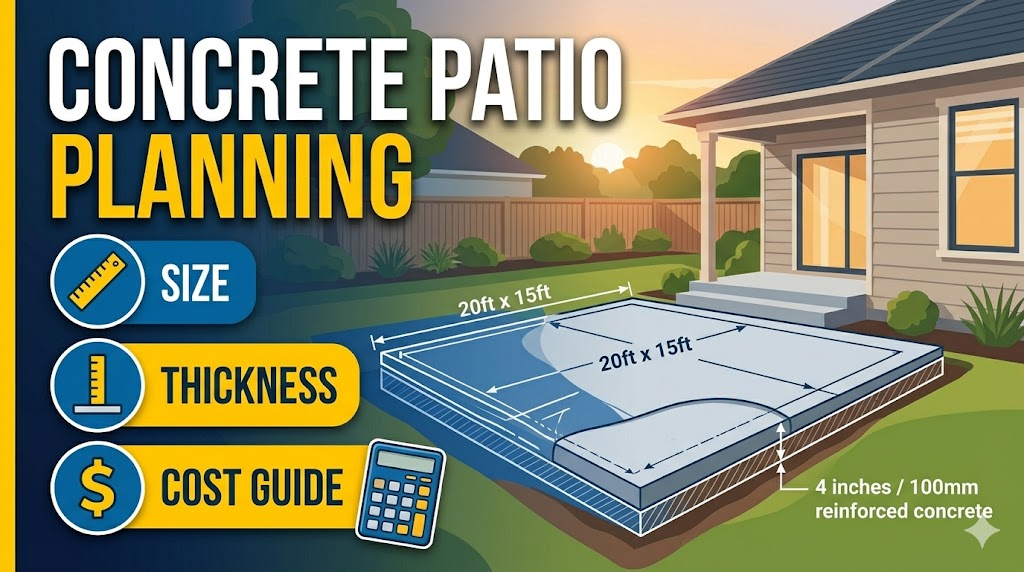
The formula is: Volume = Length × Width × Thickness. For imperial: convert thickness from inches to feet (divide by 12). For metric: convert thickness from mm to metres (divide by 1000).
Example — imperial: 14 ft × 20 ft × 4 in thick = 14 × 20 × 0.333 = 93.3 cu ft ÷ 27 = 3.46 yd³. Add 10% waste: order 3.8 yd³.
Example — metric: 4.3 m × 6.1 m × 100 mm = 4.3 × 6.1 × 0.1 = 2.62 m³. Add 10% waste: order 2.9 m³.
The Concrete Patio Calculator handles both unit systems and outputs volume in cubic yards and cubic metres, plus bag counts and estimated cost ranges. Enter your patio dimensions and it returns the order quantity with waste factored in.
Recommended patio sizes — and how they affect concrete volume
‘What size should my patio be?’ is a function of intended use. The table below shows common functional sizes with corresponding concrete volumes at 4 inches (100 mm) thick, the standard for pedestrian patio applications. All volumes include 10% waste.
| Use Case | Recommended Size | Area (sq ft / m²) | Volume (4 in / 100 mm) |
| Small seating area (2 chairs) | 8×10 ft / 2.4×3 m | 80 sq ft / 7.4 m² | 1.1 yd³ / 0.82 m³ |
| 4-person dining set | 12×12 ft / 3.6×3.6 m | 144 sq ft / 13.4 m² | 2.0 yd³ / 1.5 m³ |
| 6–8 person dining + grill | 14×20 ft / 4.3×6.1 m | 280 sq ft / 26 m² | 3.8 yd³ / 2.9 m³ |
| Large entertaining patio | 20×30 ft / 6.1×9.1 m | 600 sq ft / 55.7 m² | 8.1 yd³ / 6.2 m³ |
| Pool surround (rectangular) | 12 ft border / 3.6 m border | 480 sq ft / 44.6 m² | 6.5 yd³ / 5.0 m³ |
| Covered porch slab | 10×16 ft / 3×4.9 m | 160 sq ft / 14.9 m² | 2.2 yd³ / 1.7 m³ |
A 10 ft clearance on all sides of an outdoor dining table is the practical minimum for comfortable movement. Tables up to 42 inches (1.06 m) wide need 5 ft (1.5 m) of clear space on the chair-pull side.
Patio thickness: when 4 inches is enough and when it isn’t
Standard 4 inch / 100 mm slab
4 inches / 100 mm is correct for patios with pedestrian use only — seating areas, dining, outdoor kitchens that won’t see vehicle access. This thickness meets the ACI 302.1R recommendations for interior and exterior slabs on grade under light foot traffic loads. Rebar is optional at this thickness on a well-compacted granular subbase, though wire mesh (6×6 W1.4×W1.4 / 150×150 mm 4.5 gauge) is standard practice and costs approximately $0.15–$0.25 per sq ft in materials.
When to upgrade to 5 or 6 inches
Upgrade to 5 inches / 125 mm if: the patio will be used for vehicle access at any point (even occasional), the subgrade is clay or poorly draining soil, or the patio connects directly to a driveway section. Upgrade to 6 inches / 150 mm for patios that include a vehicle pullout or parking area, or in areas with expansive clay soils (Atterberg Plasticity Index > 15).
Each additional inch / 25 mm of thickness adds approximately 0.31 yd³ per 100 sq ft (0.024 m³/m²) to your concrete volume. On a 300 sq ft (27.9 m²) patio, going from 4 to 5 inches adds 0.93 yd³ (0.71 m³) — roughly $115–$165 in additional material at average ready-mix pricing.
Patio concrete cost breakdown
The full cost of a concrete patio has four components: material, delivery, labour, and finishing. The table below shows typical cost ranges per square foot for the most common residential patio options in the US (2024 figures, national average).
| Finish Type | Material + Labour ($/sq ft) | Total Cost (12×16 ft patio) |
| Broom finish (standard) | $6–$10 | $1,150–$1,920 |
| Exposed aggregate | $8–$12 | $1,536–$2,304 |
| Stamped (single pattern) | $12–$18 | $2,304–$3,456 |
| Stamped (multi-colour) | $16–$25 | $3,072–$4,800 |
| Coloured/integral pigment | $10–$15 | $1,920–$2,880 |
| Resurfaced/overlay (existing slab) | $4–$7 | $768–$1,344 |
The Concrete Cost Per Square Foot Calculator lets you enter your local labour rates and material costs to get a project-specific figure, rather than relying on national averages.
Expansion joints and surface drainage — the details that determine longevity
Concrete patios fail early almost always due to two causes: missing or incorrectly spaced expansion joints, and improper surface drainage slope.
Expansion joints should be placed at intervals no greater than 2–3 times the slab thickness in feet — so a 4 inch slab needs joints every 8–10 ft (2.4–3 m). Joints cut wider than 1 inch (25 mm) or deeper than 1/4 of the slab thickness serve no purpose and become debris traps. The Concrete Expansion Joint Spacing Calculator determines the correct spacing and depth for your slab thickness and local temperature range.
Surface slope of 1/8 to 1/4 inch per foot (1–2%) away from the house is required for drainage. A 12 ft deep patio at 1/4 in/ft slope has its far edge 3 inches lower than the house wall edge. This is not optional — water pooling against a house foundation accelerates both foundation damage and slab frost heave.
Common mistakes when planning a concrete patio
1. Not getting a permit for a large patio. In most US jurisdictions, patios over 200–300 sq ft (18.6–27.9 m²) require a building permit, particularly if they’re attached to the house or include structures (pergola footings, outdoor kitchen base). Unpermitted flatwork can create title problems at sale. Check with your local building department before pouring.
2. Placing concrete directly on uncompacted fill. Freshly placed fill, topsoil, or organic material will settle. Minimum compaction standard is 95% Proctor density for the top 6 inches (150 mm) of subgrade. On fill over 12 inches (300 mm) deep, allow at least 90 days after compaction before pouring.
3. Pouring a stamped or coloured patio in direct sun above 90°F / 32°C. Hot, dry conditions accelerate surface drying relative to the slab interior, causing plastic shrinkage cracking that is impossible to repair invisibly in decorative concrete. Pour early morning, use evaporation retarder, and erect shading if ambient conditions exceed 85°F / 29°C with wind.
4. Skipping the curing compound or wet curing. Concrete gains 70% of its design strength in 7 days and 90% at 28 days — but only if moisture is maintained. Unsealed concrete in low-humidity conditions loses surface moisture within hours of placing, reducing surface strength by 15–25%. Apply a curing compound immediately after finishing, or keep wet-cured under plastic for a minimum of 7 days.
Related calculators you might need
Before finalising your order, verify your total concrete volume with the Concrete Patio Calculator. If you’re adding a stamped or coloured finish, the Stamped Concrete Calculator estimates the additional material cost for stamps, release agents, and sealers. For budget planning, the Full Concrete Project Estimator combines material volume, delivery, labour, and finishing in one figure. If you’re working with an existing slab that needs repair rather than replacement, the Concrete Resurfacing Calculator calculates material quantities for overlay applications.
Frequently asked questions
How much does a 12×12 concrete patio cost?
A 12×12 ft (3.6×3.6 m) concrete patio at 4 inches thick requires 2.0 cubic yards (1.5 m³) including 10% waste. At national average pricing, installed cost runs $865–$1,440 for a standard broom finish. Stamped or coloured finishes add $6–$15 per sq ft, bringing the total to $1,730–$3,310 for 144 sq ft. Regional pricing varies substantially — the Concrete Cost Per Square Foot Calculator lets you enter local rates for an accurate estimate.
What is the best thickness for a concrete patio?
4 inches / 100 mm is the standard and sufficient for patios with pedestrian use only. If your patio connects to a driveway, will ever have vehicle access (even a golf cart or wheelbarrow), or is built on clay soil, use 5 inches / 125 mm. Pool decks and patios with heavy planters or outdoor kitchen islands should be 5 inches minimum, with the kitchen island area at 6 inches if it will see concentrated point loads.
How long before I can walk on a new concrete patio?
Foot traffic is safe at 24–48 hours for standard mixes in normal weather conditions (65–75°F / 18–24°C). High-early-strength mixes (Type III cement) can accept foot traffic at 10–12 hours. Furniture and heavy loads should wait until 7 days. Do not allow vehicle traffic for 28 days. In cold weather (below 50°F / 10°C), all timelines extend by 1.5–2× depending on temperature.
Do I need rebar in a concrete patio?
Wire mesh (6×6 W1.4×W1.4 welded wire fabric) is standard for residential patios on stable subgrade. Rebar (#3 or #4 / 10 mm or 13 mm) is preferable for patios on fill, clay soils, or sites with frost depth greater than 18 inches (450 mm). Rebar at 18 inch (450 mm) centres both ways adds approximately $0.40–$0.65 per sq ft to material cost but meaningfully reduces cracking risk over the slab’s service life.
How much slope should a concrete patio have?
1/8 inch per foot (1%) is the minimum slope for a covered patio. 1/4 inch per foot (2%) is the standard for exposed patios that receive rainfall directly. This means a 16 ft deep patio at 1/4 in/ft pitch has its outer edge 4 inches lower than the house-side edge. Confirm the required cross-slope with your local building department — some jurisdictions specify a minimum in code for patios adjacent to foundations.

Concrete is the most widely used building material on Earth, yet some of the most important decisions behind it are still made with rough guesses, outdated spreadsheets, and conflicting advice from random websites.
We thought that was a problem worth fixing.
Every calculator and guide on this platform exists for one reason: to replace uncertainty with reliable numbers. Whether you’re estimating a slab, planning footings, calculating reinforcement, comparing mix designs, or budgeting a project, the goal is the same—help you make decisions with confidence before concrete is poured.
We don’t publish calculators for the sake of having calculators. Every formula is researched, tested, and built around real construction requirements. Every guide is written to answer practical questions that contractors, builders, engineers, and homeowners actually face on job sites—not questions invented for search engines.
Because concrete is unforgiving.
A small mistake in volume estimation can waste thousands of dollars. An undersized footing can create structural problems. Incorrect reinforcement calculations can compromise performance. Once concrete is placed, many mistakes become expensive—or impossible—to undo.
That’s why accuracy matters.
Our approach is simple: start with the engineering, verify the calculations, explain the reasoning, and present the results in a way that anyone can use. No inflated claims. No copied content. No generic formulas stripped of context.
Just practical tools, clear guidance, and calculations designed to solve real-world construction problems.
The internet has plenty of articles about concrete.
We’re building a resource that helps people work with it.